iOS  Tree

"All of us do not have equal talent. But , all of us have an equal opportunity to develop our talents.” – A.P.J Abdul Kalam

Swift macros #if – #endif — April 24, 2020

Swift macros #if – #endif

During iOS development we come across multiple environments (Staging & Production).

We can use #if to differentiate Development, Staging & Production at one time, we can create different scheme to take the build easily.

Example:
//MARK:- Macros
var APIURL: String {
#if dev
return "http://192.168.0.1/"
#elseif stg
return "http://demo.example.com/"
#else
return "http://live.example.com/"
#endif
}
print(APIURL)

You can use #if dev anywhere in the project to achieve code execution. Suppose, If you need to show their logs only in development and not in staging then you can write only inside dev and not in staging or live.

Example: You will be having logs only in development and the entire print will work under development scheme. Logs will not show/print for staging and live.

Follow the below steps to add macros into project.

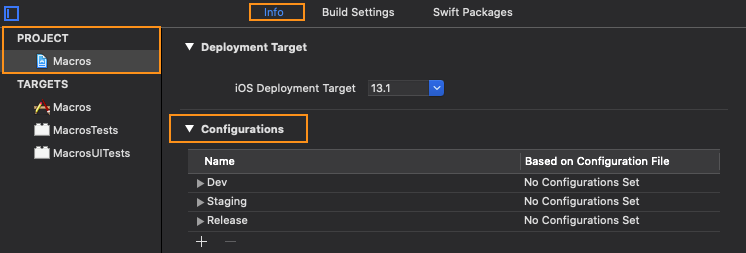
  1. Goto: Project → Info → Configurations
  2. Click + to add your macros
  3. Goto: Target → Build Settings → Other Swift Flags
  4. You need to add flags to the macros (Dev-Ddev, Staging-Dstg)
  5. Always should add with prefix -D without space to use inside code

Overview:
Now you need to create multiple scheme, so that you can change the scheme & run to get different line code execution for a same variable or function or class.
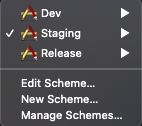
  1. Goto → Edit Scheme…
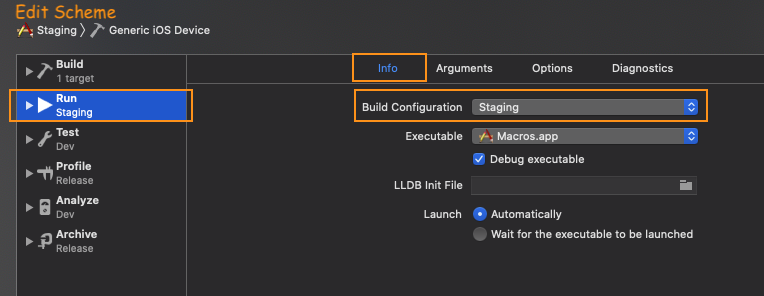
  2. Run → Info → Build Configuration
  3. Select scheme in Build Configuration to run in particular scheme
Lets’ grow together 🌱
Cheers 🍻

iOS Battery Level — April 21, 2020

iOS Battery Level

First we need enable battery monitoring to get Battery Level & Battery Status

UIDevice.current.isBatteryMonitoringEnabled = true

Battery level ranges from 0.0 (fully discharged) to 1.0 (100% charged)

To get the Battery Level

var batteryLevel: Float { UIDevice.current.batteryLevel }

You can add observer to monitor Battery Level continuously.

NotificationCenter.default.addObserver(self, selector: #selector(batteryLevelDidChange), name: UIDevice.batteryLevelDidChangeNotification, object: nil)

//MARK:- Get Battery Level
@objc func batteryLevelDidChange(_ notification: Notification) {
print("\(Int(batteryLevel * 100))%")
}

Ref: Apple Document – Battery Level

You can also verify the battery power state of the device

var batteryState: UIDevice.BatteryState { UIDevice.current.batteryState }

Overview:

Enumeration constants are used by the batteryState property

  1. case .unknown
    The battery state for the device cannot be determined

  2. case .unplugged
    The battery is discharging

  3. case .charging
    The device is plugged into power & the battery is less than 100% charged

  4. case . full
    The device is plugged into power and the battery is 100% charged

You can add observer to monitor Battery State continuously.

NotificationCenter.default.addObserver(self, selector: #selector(batteryStateDidChange), name: UIDevice.batteryStateDidChangeNotification, object: nil)

//MARK:- Get Battery State
@objc func batteryStateDidChange(_ notification: Notification) {
switch batteryState {
case .unplugged, .unknown:
print("Not charging")
case .charging:
print("Charging")
case .full:
print("Full")
@unknown default:
print("Nothing")
}
}

Ref: Apple Document – Battery State

Sample:

private(set) – Getters and Setters — April 18, 2020

private(set) – Getters and Setters

You assign a lower access level by writing private(set).

Its work like Public getter and Private setter

//MARK:- Foo
class Foo {
private var name: String
private var ID: String

//initialize
init(name:String, ID:String){
self.name = name
self.ID = ID
}
}

We will end with error, when to try to access private variable.

But we can access with new and awesome way to do this in a single line.

Then change private access level to private(set)

//MARK:- Foo
class Foo {
private(set) var name: String
private var ID: String

//initialize
init(name:String, ID:String){
self.name = name
self.ID = ID
}
}

So you can easy access the private variable, constant, property, or subscript.

//Access class value from Foo
let fooObjc = Foo.init(name: "test", ID: "9900")
print(fooObjc.name)

Use fileprivate(set), private(set), and internal(set) to change the access level of this synthesized setter in exactly the same way as for an explicit setter in a computed property.

This property can be read, but cannot be set from the outside

Make a call from String — April 16, 2020

Make a call from String

You can use a simple function below to make a call from your iOS app.

//MARK:- String
extension String {
//MARK: makeACall
func makeACall() {
guard let url = URL(string: "tel://\(self)"), UIApplication.shared.canOpenURL(url) else { return }
if #available(iOS 10, *) {
UIApplication.shared.open(url)
} else {
UIApplication.shared.openURL(url)
}
}
}

You can call from anywhere like
"9876543210".makeACall()
"1(617)111-22-33".makeACall()

It will fail to run in some cases like below example

"#$%^:+1(617)111-22-33".makeACall()
"Phone: +1(617)111-22-33".makeACall()

Make sure that, your phone number should be in numeric format.

Note: To get the result, run the app on a real device because it won’t work on the simulator 

Get App Version & Build Number — April 15, 2020

Get App Version & Build Number

You can declare globally to get appVersion any where.
Swift:
//MARK:- appVersion
public var appVersion: String {

//versionNumber
let versionNumber = Bundle.main.object(forInfoDictionaryKey: "CFBundleShortVersionString") ?? "1.0"

//buildNumber
let buildNumber = Bundle.main.object(forInfoDictionaryKey: "CFBundleVersion") ?? "1.0"

return "Version: #\(versionNumber) (#\(buildNumber))"
}

print(appVersion)

Output:
Version: #1.0 (#1.0.3)

Singleton Class in Swift — April 7, 2020

Singleton Class in Swift

Overview

  • Singleton is a design pattern that is very popular in development.
  • Singletons are easy to understand.
  • The singleton pattern guarantees that only one instance of a class is instantiated.
  • In Apple’s frameworks we have come across below singleton classes:
    // Shared URL Session
    let sharedURLSession = URLSession.shared

    // Default File Manager
    let defaultFileManager = FileManager.default

    // Standard User Defaults
    let standardUserDefaults = UserDefaults.standard

    There are times that you want to make sure only one instance of a class is instantiated and that your application only uses that instance. That’s the primary and only goal of the singleton pattern.

    Example:
    //MARK: - Location Manager
    class LocationManager{

    static let shared = LocationManager()

    init(){}

    //MARK: - Location Permission
    func requestForLocation(){
    print("Location Permission granted")
    }

    }


    //Access the class with Singleton Pattern
    LocationManager.shared.requestForLocation() //"Location Permission granted

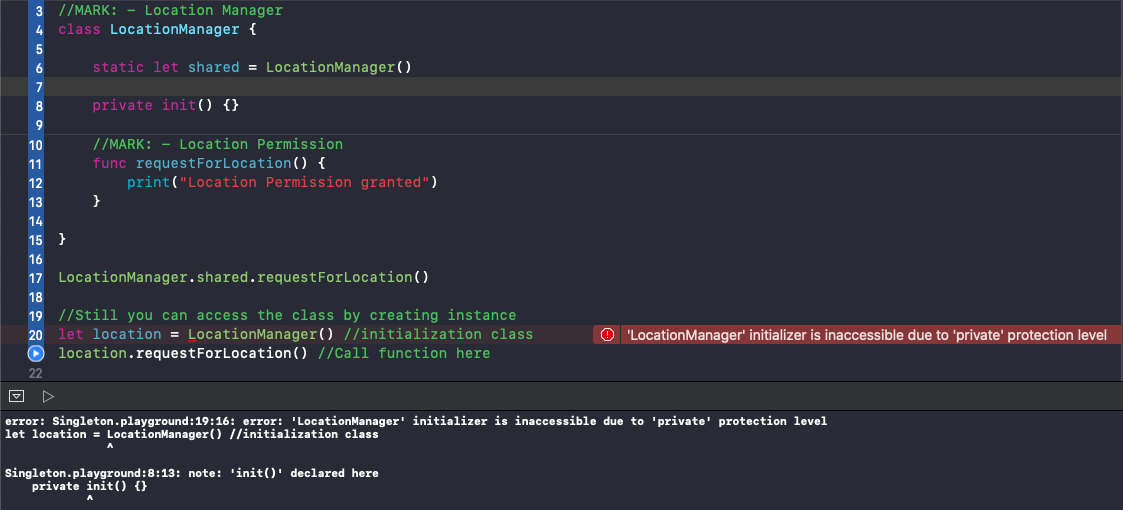
    //Still you can access the class by creating instance
    let location = LocationManager() //initialization class
    location.requestForLocation() //Call function here

    So we have to change the access level of initializer

    private init(){}

    Above class is having by default internal initializer, its change to private. Now you can’t initialize your singleton class again.

    iOS Smiley Rating — April 1, 2020